| |
| Articles |
Tutorials
| Building a Double Slip Switch, by John King |
| Read | Write comments: 12 |
Posted Thu Feb 07 2002 11:37am |
Page:
1
2
3
4
5
6
7
8
|
When working with this and any other tutorials written by me, we'll try to use the computer keyboard instead of the Surveyor menus wherever possible. This will allow us to achieve some level of productivity because using the menus definitely reduces your output. Unfortunately there seem to be some minor problems with some of the Trainz keyboard shortcuts, so don't hesitate to use the menus if you're not getting the required results. One such problem is the insertion of splines. The (I) "Insert Spline" shortcut only works under certain conditions.
Because Trainz is a complex program, I strongly suggest you design your first switches or turnouts for testing purposes only. Once you've done one, the rest will be easy. For example I was able to build my second double switch in a matter of minutes. The first one took almost an hour.
When I refer to the cursor keys, I mean the ones closest to the right hand shift key. This also applies to the Page Up and Page Down keys. As far as I'm aware, the Number Pad cursor keys are ineffective.
Building the Double Switch
Firstly, the double slip is probably the most complicated switch on any railroad system. It's ideal for confined areas, it looks complicated and works great. I'm not going to tell you why a double switch would be used on a layout, but if you have a chance, try to put one somewhere.
Here's what the finished switch will look like when viewed from close up (Fig.01). Neat, complex, but fully functional. And what's more, it's a cinch to build!
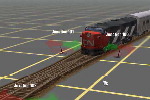
fig.01
Okay, let's start!
Setting Up the Work Area
Use the Page Down (PD) key to Zoom out. Don't go too far or the track may not appear. Play around with the Page UP (PU) and (PD) keys at all times to give yourself the best viewpoint.
Use the Up Cursor (UC) and Down Cursor (DC) in the same manner to create a level working area as in Step 1.
To move the compass, use the Right Mouse Button. By placing the cursor on the compass and holding the (RMB) down, you can move the compass wherever you like. Alternatively, you can pace the mouse pointer at a certain place and click the (RMB). The compass will then settle in that location.
These few simple tips will enable you to scoot around the site like Superman.
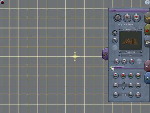
fig.02
Next Press (F4) or click on the Track Tab. This will open the Track menu. Now click the Advanced button (See location of cursor opposite) to expose the Advanced menu. You may now close the menu if you wish by pressing (F4) or clicking on the Track tab.
|
|
|
|

