I decided long ago (well, about 4 weeks prior to writing this article) it would be better to live with some drives sticking out of the neighboring track than to live without slips. But this is my decision,. you may well come to a different conclusion.
So we attach the four drives, far from the center at first and move them inwards later on. Here we should name them in an early stage, because even that is difficult in the confined space when they are in final position. For the systematic: I name the four switches, that together build up the slip
Maulburg W 002 1
Maulburg W 002 2
Maulburg W 002 3
Maulburg W 002 4
beginning with 1 with northernmost switch and moving clockwise around the slip. Basic position is again pointing in straight direction. You will be thankful for such easy to memorize rules once you start to operate them in the HUD of Driver module.
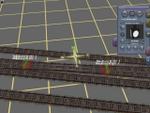
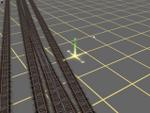
In the end we will have something like this here (Fig.31, Fig.32)
fig.31 and fig.32
Well, with some practice, building a double slip takes only a few minutes.
Trick:
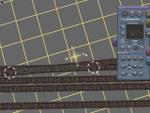
A beautiful curve back to parallel could be derived by introducing and connedting additional splinepoints like in designing a switch (Fig.33) but deleting two straight tracks in the end (Fig.34)