| |
| Articles |
Tutorials
| GP7 Tutorial, by Josh E. Harvey |
| Read | Write comments: 11 |
Posted Thu Feb 07 2002 12:02pm |
Page:
1
2
3
4
5
6
7
8
9
|
To create the Lights first create a Rectangle and change the corn radius to give a slit rounded edge then go to the interpolation roll out and change the steps to 1, extrude the new spline out. For the Lights a GeoSphere will probably look best, with the segments down to 1-2 and Hemisphere checked. (fig.34, fig.35)

fig.34
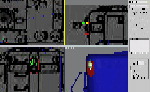
fig.35
Other small details you should be able to put in on yourself by now, once you are done putting those little details in attach all the objects together, don't attach the bogies or wheels together though, you should have your engine then the 2 bogies then the 4 wheels.
There is 2 things we need to do, first we need to make an inside to our cab and second we need to delete any polygons that wont be seen.
Start off by selecting the engine and going into Element sub object, select the cab and detach it as a clone, name the clone whatever you want, but select the new object (I named it cabinside) and go into element sub-object mode select the cab then go down to the "surface properties" roll out and hit the button "flip". (fig.36)
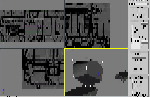
fig.36
Well there is the cab or what it should like after you hit flip, texture it before you attach it back to the engine, make sure it is using the same material as the engine or you may have troubles, don't forget it! Because after you attach it back to the engine you mite have troubles editing it if you need to fix something so make sure it is just right before you attach it back to the engine.
|
|
|
|

